Showing posts with label Brandon School. Show all posts

Wednesday, June 16, 2010

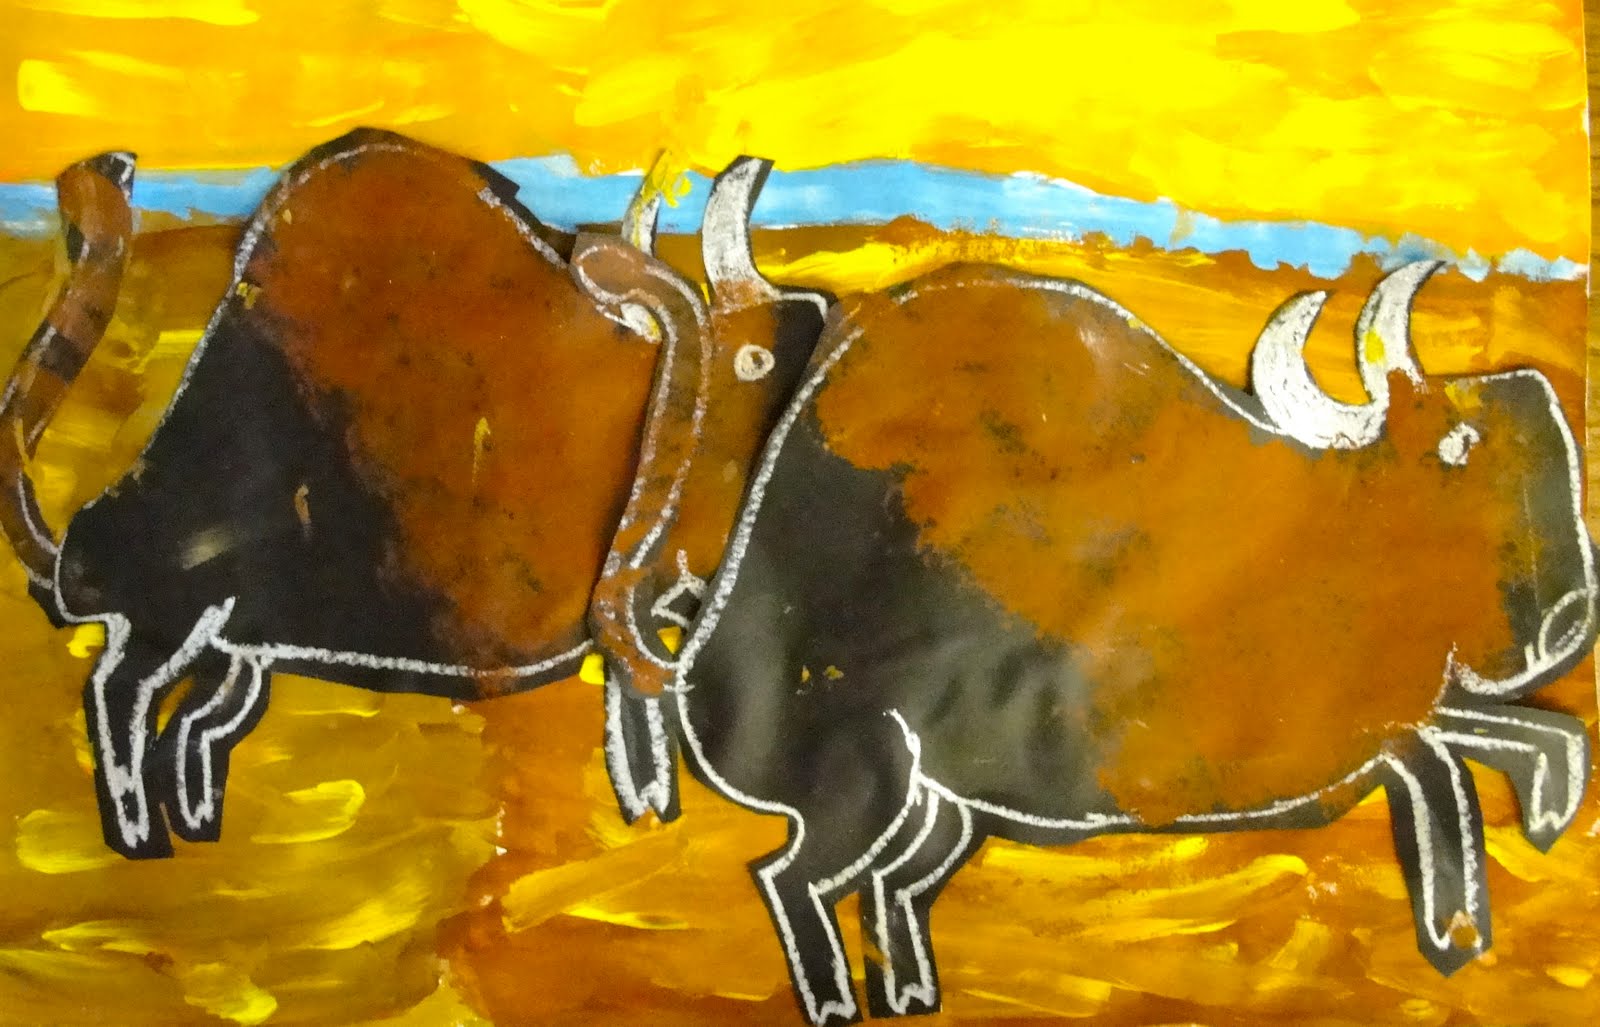
Buffalo Painting Art Project

Sometimes it takes a while for an inspiration to hit. I've had a calendar in my art stacks for about five years now. Paintings of the American West. The paintings depict the lives of Native Americans, complete with beautiful sunsets, buffalo hunts and vast plains. As part of my unit on Native American Costumes, Customs and Culture, this "buffalo hunt" was a huge success with my 2nd grade students.
We talked about buffalo and bison and the misnomers surrounding the names. Check out this website for surprising facts! I directed them through the series of selected paintings detailing "hunts" and spoke about the colors and shapes in the paintings.


What you'll need for the Buffalo...
  • 12" x 18" black drawing paper
  • White oil pastel
  • Small sponge
  • Brown tempera paint
  • scissors and glue
For the Background...
  • 12" x 18" white drawing paper
  • Earth colored tempera paints
  • Sky colored tempera paints
  • Brushes
Step One: Drawing the Bison

Demonstrate a simple drawing of a bison. Remember to point out the very big head and rather small legs! Here is a good drawing to print out for reference. Using a white oil pastel, I like to begin at one end of the black paper and draw the eye. Then, draw one tusk, the big forehead and then the back. Make sure the shoulder goes up and up (think hunchback) and curve downwards for a small butt. Add legs and other details.
Using a small sponge and some brown tempera paint, dab the paint around the shoulder and head area.

Step Two: Cutting out the Bison

After the paint dries, cut along the white line of the bison. Some kids made smaller bison and had extra room on their black paper for another bison. Draw and paint as many as you would like.

Step Three: Painting the Background
Using a palette of sky and earth colors (encourage mixing here), make a line across the length of the page. The sky will be above this line and the earth will be below. Using the calendar photographs as inspiration, the kids created their own landscape. Some used browns, oranges and yellows while others used traditional blues and greens. Whatever choice they make is fine. After the paint dries, glue on the bison.


Second Grade Results!

Friday, June 4, 2010

Nautical Ceramic Tile Mural


It's done! Brandon School's beautiful nautical-inspired mural is complete and not a moment too soon. Every year, the 6th grade class participates in a special art project creating a mural for the beautification of the school. This was our fourth mural and already the school's interior court is looking quite grand!
I plan to compose an entire lesson plan available through download in the near future. Many people have asked about my murals and my answers always take way too long to explain. There are so many factors that go into creating a student mural. The drawing stage, clay stage, glazing, firing and most important, mounting. This mural motivated me to document each step as everything that could go wrong, did. Seriously. I was ready to pull my hair out. So my mistakes will be your gain!
I'm so proud of the student's efforts though, so I just had to show-off their work!


On a personal note, my middle child, Tate, just graduated from Junior High last night and today is the first "official" day of summer. A sense of calmness has overcome our home. It's wonderful.

Sunday, October 25, 2009

Day of the Dead Art Project

Second grade used the same technique as the First Grade Skull project, but drew a full skeleton instead of a simple skull. Simple instructions this time...I think it's fairly easy to follow!
1. Use a white oil pastel to draw a skeleton with clothes...chose a man or woman.
2. Use white tempera paint to paint over the "bones".

3. Use tempera paint (mixed with a bit of white) to paint the clothes.
Second Grade Results!

Sunday, October 4, 2009

Maud Lewis Lighthouse Mix Media


This folk artist from Canada is one of my most favorite artists. Her vibrant, child-like art is not only full of joy but many of her pieces are inspired by the rugged, yet tranquil beauty of Nova Scotia, which is also my birthplace (Yay, Pictou!). Many of my students have never heard of Nova Scotia so it's fun for me to talk about.
Whenever I'm back home in the summer, I usually pick up a Maud Lewis Calendar but you probably can find one via the Internet.
For this lesson, I speak of fishing dories, lobster boats and traps, colorful buoys, and of course, lighthouses. I also share stories of how Maud created her paintings with limited use of her hands plus working through the disadvantage of being very poor.


Supplies :
12" x 18" white drawing paper
Pencil
Tempera paints: light blue, white, dark blue, green, yellow and black
Paint brushes and water containers
Printed craft paper plus solid colored paper
scissors
Glue sticks

Step One: Creating the background

To begin the lesson, I hand out 3 photocopies of Maud Lewis' works from calendars that I have purchased. I chose three of my favorite images, focusing on lighthouses and the Atlantic Ocean.
I demonstrate how to draw the hill, the horizon line and perhaps a few rocks. All other details such as the lighthouse, buoys, etc. will be added in the second stage of this lesson.
Using the light blue paint, I show the kids how to apply the paint and then, while its still wet, add white paint to create a light sky.

After the sky, paint the hill (mix green with some yellow) and then the ocean Mix dark blue with black for a deep navy or dark blue with green for a brilliant turquoise). After painting the ocean, the sky will probably be dry enough to add another layer of white for clouds.
For the rocks, dip a small paintbrush in the black paint and paint along the outside line of the rocks. Then, dip the paint brush into the white paint and mix together to create a grey.

Step two: Adding the Paper Lighthouse

Using a variety of printed craft or solid colored paper, cut out light houses, small houses, dories, fish, a setting sun, etc. I demonstrate the technique of using just scissors to create shapes. If the kids get out pencils, the subject they are trying to create usually ends up being much too small. Seriously! Stick with scissors!
Let the kids use their imaginations for how they want to decorate. Some kids will go a bit crazy, but that's okay. Some will be Maud Lewis muses a channel her love of the ocean. Either way, I think they'll enjoy this project.

Some details such as the small windows and doors on the lighthouses can be applied with paint.
This is a good time to add splashes of white paint to well, create splashes!

Fifth Grade Results!

Thursday, September 24, 2009

Fall leaves in Tissue Paper

Nothing is more beautiful than a tree emboldened with crimson and pumpkin colored leaves. In Santa Barbara, we have few trees that display this wonderful show but our imaginations make up for this lack of seasonal change.
I was inspired by Kathy's art journal pages from Art Project for Kids and wondered how I could translate this lesson for my second grade class.
I found a perfect line drawing of fall leaves, cut some squares of red, orange, yellow, green (and yes, I'll admit it...) purple and let my students enjoy the color of autumn.

Supplies:
6" x 9" white drawing paper
Tissue paper cut into 5" x 5" squares
Mixture of white glue and water
small paint brush
Black marker (waterproof is best)

Time: One 40-minute class
The Set-up

Step One: Tracing the Leaves

Step Three: Arrange the leaves on the paper and brush
smooth with the glue mixture

Step Four: Pick your next leaf and do it again!
Encourage overlapping!


The Results!
Related Posts Widget for Blogs by LinkWithin