 My third grade students completed this project before Christmas, but with the holiday break, I forgot to post it. The project is as about as easy as you can get. The only area of "struggle" was cutting out the pot. Despite it's challenges, this component of the project provides a valuable opportunity to understand symmetry.
Supplies:
12" x 18" white construction/sulphite paper
12" x 18" Black construction paper
Tempera Paints (I selected red, yellow, rose, white, etc)
Sponges cut in "petal" shapes
6" x 6" colored construction paper
Paint brushes
Yellow or orange tempera paint
Gold metallic tempera paint
Tissue paper
Scissors
White School glue
Glitter
Step One: Stamping the Petals
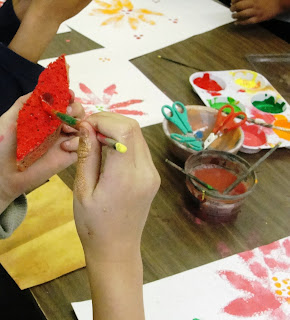 With a paint brush, add the centers of the flowers on the top section of the white paper. The kids can use the backs of the brushes for small dots, or paint larger circles with the bristles.
Using a paintbrush, paint desired color onto a sponge. As the kids get good at this, let them experiment by adding two or more colors to the sponge. One color at the tip, another at the bottom, etc. Most likely, they'll ask before you suggest it.
 Press painted sponge gently on paper, pointing tip of sponge towards the center of the flower. Keep going. The paint will begin to weaken after the third or fourth press.
Step Two: Making the Vase
 While the poinsettia's dry (I usually put these aside for the next class), bring out the supplies to make the vase.
To make the pot symmetrical, fold the square of paper in half. Now this part is tricky. (I'd recommend trying this yourself so you can pick the right verbiage to teach the kids.)
Start at the bottom of the folded paper (left hand holding the paper and right hand holding scissors), begin the cut in the middle of the bottom edge. Cut upwards and on an angle. You might find it easier to cut the notch of the pot out first, then cut the diagonal line.
Open up the fold and you have a perfect pot!
Using a small sponge, dab gold metallic paint onto Vase surface. Let dry.
Step Three: Adding Tissue Paper to the pot
Gently fold small squares of tissue paper and tape or glue onto the backs of the pot. The tissue paper should ruffle slightly when the pot is turned over.
Step Four: Putting all the pieces together
 Now that the poinsettias are dry, cut around the flowers. If a flower is not connected to any of the others and you end up with more than one piece, no problem. The goal is to glue them back together onto a piece of black construction paper.
Glue the flower section to the black paper and then glue the pot with the tissue paper. For an added feature, my students outlined selected areas of their flowers (the dots, the stems, etc) with white glue and we added glitter.
This added a nice holiday touch and a much needed sparkle to our classroom!
Third Grade Results!












3 comments:
These are great! Thanks for posting :)
What a fun project, I'm loving all these pots! Thanks so much, I'll be linking.
Post a Comment