 These adorable owls were created by my second grade students. It appeared to be the perfect project for them. Each student determined which owl they wanted to draw: in-flight or sitting. Tearing the bits of paper proved easy for their nimble hands. I'm quite sure that this lesson would be suitable for either first or perhaps third, but any higher grade might find the project too simple.
Supplies
- 12" x 18" blue construction paper
- Scraps of browns, whites, grays and black paper for the owl
- Bits of green, orange or yellow paper for the eyes and beak
- Glue sticks and scissors
- Black, yellow and white oil pastel for drawing the outline
Step: 1 Drawing the Owl
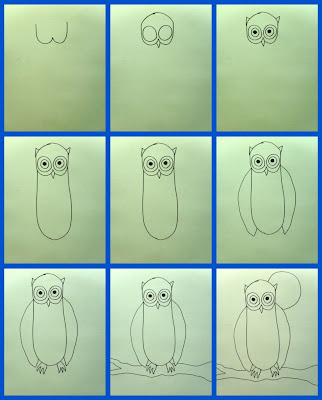
On the white board, I show the students how to draw a simple owl. I tack a few pictures on the white board to give examples of sitting owls and in-flight owls (Picture books are good references).After my demonstration, you can either do a directed line drawing with the students, or have them draw on their own (About five minutes). Have them draw in oil pastel and if they make a mistake, either turn the paper over if it is major or simply tell them that they'll be covering up most of the drawing with paper.
Add stars and a moon and color in deeply.
Step 2: Filling in the Owl with "Feathers"
Provide a variety of browns, grays and black paper either in a container on each table or from a central station in the art room. Show the kids how to tear the paper into long strips then into small squares. It helps to have a bunch of feathers before gluing.Now, swipe the glue around a small area and fill with feathers. Work fast before the glue dries!
Fill in the entire face first. Yes, you will cover the eyes but the kids will remember where they are! Get ready for step 3...

Step 3: Adding the Beak and Eyes
This is the only time the children need scissors. Cut out large circles for the eyes and another smaller circle to go inside the eyes. I generally let them chose their own colors. I like the eyes that look like fried eggs!Do the same for the beak.

Step 4: Filling in the Wings and Body
For best results, encourage the children to use different colors for the body and wings. If they are the same, they tend to blend in together. Show them how to do multiple colors for feathers, stripes, etc.Tip: Most kids can finish this project in two forty minute lessons, but of course, some need much longer. Keep a tray of "feathers" for future classes so when time becomes available, the child can return to his project and finish.


Alternate Owl Drawing:








7 comments:
Patty--these owls are beautiful. I feel like they could launch into flight right off the page. I'm resisting the impulse to start tearing paper, but I do think a re-read of Owl Moon might be in order
(I just found a hard copy of the 20th anniversary edition on sale!)
These are so beautiful! I want to start tearing paper towels, too!
I did this project with my 1st graders a few months ago (and last year too)....but I like your different colors and the flying one, too!
I may change them up to be more exciteful next year.
These are SO cute! I just love the eyes. I'll be linking.
I have a very difficult 2nd grade class. Their abilities are very low and many are having problems with simple directions. I took your owl lesson and modified it today...and I have never been so happy and excited for a class of kids before! They did amazing. I was jumping up and down by the end of class! Thank you so much!
Anonymous,
Yay! A successful lesson. There is no better feeling, huh?
I did this today w/my son's 2nd grade class. They had about 40 min and I think 50% finished while the others did not. It went over well though!! I really enjoyed it. Thank you for the wonderful lesson.
Post a Comment