 The ultimate Deep Space Sparkle lesson! This is super fun and is sure to ignite the imaginations of the little ones. I have done this lesson with my first graders in two 40-minute sessions. In order to complete in within this time frame, be sure to allow enough time to organize your supplies.
Supplies Per student:
One 12" x 18" white construction paper
Rectangular shaped piece of tag board (for main rocket)
Variety of pre-cut tag board shapes
Popsicle sticks (optional)
White glue
plastic buttons for decoration
white tempera paint or Gesso
Oil Pastels
Glitter paint
Black paint
Gold and silver metallic tempera paint

Step One: Becoming a Rocket Scientist!
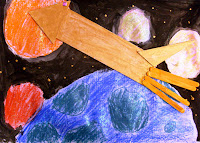
Begin by giving each child a piece of white paper. This will serve as a table protector, rocket stabilizer and eventually, the background! Directly onto this paper (but not glued to), allow each child to build their rockets with pieces of tag board. Show the children pictures of rocket ships but encourage them to design their own idea of a what they think a rocket should look like. Make sure all the parts are glued to the rectangular base and not to the paper.Once the ship is built, paint all surfaces with gesso or white paint.

Step Two: Coloring the Planets
Using oil pastel, draw large circles for the planets and color them in with oil pastels. Show the children how to put some planets in the background and some up front. Swirl glitter paint over the oil pastel planets to create a sparkling universe!

Step Three: Painting Deep Space
Using the black paint, have the children paint around the planets, making sure not to paint over or through the planets. Using the back of the brush, the kids can add stars using gold or white paint.Step Four: Painting the Rocket
Once the rocket has dried (usually the next class), the kids can now paint their rocket however they wish. Then glue the rocket to their background page.











2 comments:
Yes! I LOVE this rocket project- my kids will LOVE this :)
I love this too! Thanks for sharing it!
Post a Comment