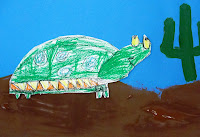
 Based on the book "Manana Iguana" by Ann Whitford Paul, this adorable collage lesson is perfect for little kinders. Children learn how to draw Tortuga the Turtle as drawn in the picture book and paint a desert background.
I do this lesson in three thirty minute classes.
 Supplies:
- 12" x 10" white paper
- Oil Pastels
- scissors and glue sticks
- 12" x 18" blue paper
- Tempera paints: brown, white, yellow, light green and dark green
- paint brush and water
Step One: Drawing "Tortuga"
There are some great turtle drawings in this book. Cute, simple and artsy. I love how Tortuga's eyes stick up from his head. That is what we start with: the eyes. Draw two ovals on one side of the paper. Draw a big oval around the eyes taking care not to draw through the eyeballs! Add a neck. For the body, draw a curved line from the neck all the way to the back of the paper. Kid's will know instinctively how big to draw their turtle, so let them. Much cuter this way!Then add a bottom and four legs.
This step is a challenge for many kinders. Some kids have cutting experience but if your group struggles with this part, don't be surprised. I've taught second graders who can't cut well, so consider this lesson great practice! The hardest part for little hands is navigating around a curvy bottom. To avoid this, encourage the kids to draw a straight line for the underbelly. Believe me, much easier for them.
This is how I set up for the class. The cut-out turtles are in a pile on a separate table. So when the children finish painting their background, they can glue the turtle on right away.
I must say however, that this particular group had a hard time finishing the background in the allotted time and most didn't finish coloring in their turtles from step one. So I'll add another class so that everyone can have a finished piece.
Doesn't always work this way. The next group of kinders finished everything. Many variables involved: talkative children, late getting to class, etc. None a problem. Just need to be flexible!
 With an oil pastel, the kids drew a straight line across the middle of the page. They added a sun plus a cactus for an authentic desert landscape.
By now, the kids should have a finished background and a cut-out turtle. Most of my students needed to finish coloring in their turtles, so we will add an extra class to do this. A nice extra detail would be to add spikes on the cactus, and outline the oil pastel lines again.

The results!









3 comments:
What are the turtles colored with? Great book... I ran to my school's library to check it out. I work at an inner city school in Phoenix where the majority of our student's first language is Spanish. They will love this book and project. Thanks!
I used oil pastels but you could use crayons if you want. Glad you like the book!
I just ran part 1 of this project with my kindergarten art classes. Perfect! 40 min. period allowed time to read the entire book, plus compare it to the Little Red Hen story, do the oil pastel drawing and partially color in. Allow extra time for hand washing! They really enjoyed the book.
Post a Comment