


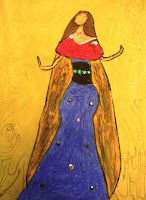
 Sometimes inspiration comes in many forms. I was perusing one of the many art supplies catalogs that happen upon my desk and I saw metallic paint for sale. Gold, bronze, copper, silver...rich, showy colors. I immediately thought about Gustav Klimt. Having been to the Museum of Modern Art in New York this past winter, I picked up a copy of "Klimt and his Cat" by Berenice Capatti. The story was great but it was the illustrations by Octavia Monaco that drew me in and had me devising an art lesson for my sixth graders.
I thought this would be the perfect opportunity to incorporate my old profession as a fashion designer, into my new one, an art teacher. I had a variety of collage type materials on hand...sequins, buttons, fabric scraps, and now metallic paint! I was ready to go.
I photocopied some of the illustrations from the book to serve as inspiration but challenged the kids to come up with their own Klimt woman. We talked about how Klimt drew stylistically; small heads atop long, graceful (and often distorted) necks. I was in heaven. It was fun watching the children draw in such proportions; small heads with large bodies, but they did it.
I photocopied some of the illustrations from the book to serve as inspiration but challenged the kids to come up with their own Klimt woman. We talked about how Klimt drew stylistically; small heads atop long, graceful (and often distorted) necks. I was in heaven. It was fun watching the children draw in such proportions; small heads with large bodies, but they did it.


After our first session, most of the children got to this stage:
Step one: Draw figure with pencil. Small head, dress flowing off the page, hair sweeping off to the side.
Step two: Color deeply with oil pastels. Decorate with collage materials (buttons, fabrics, etc.)
For the second session, we will continue to decorate the dress with geometric designs, focusing on layering our patterns. We will add faces and then do the background...stayed tuned!

UPDATE! The sixth graders at Foothill finished their beautiful Klimt Women. I was so impressed by how carefully they selected their embellishments. Each student had a specific idea of how they wanted their dress to look.
First, though, we had to make our background. Using watercolor paper, we smeared two chalk pastels (use rich, earth tone colors) over the entire surface. Then, using glue bottles mixed with white glue and metallic paint, we created designs in swirly curly-ques, geometric patterns, etc. After the paint dried and set slightly, the students cut out their "women" and glued it onto the watercolor paper (carefully!). Most students didn't get the chance to complete the faces, but this can be done during other art classes. Awesome job, Foothill kids!!!








5 comments:
All the projects you are doing are fantastic. They all look like so much fun!!!! My class loves art!!!
Thanks guys! I love having you in my class.
Isn't Ms. Sharfeld so talented!
Mrs. P
I love your site. I teach middle school 6,7,8 and I see a lot here that could translate to many levels easily. I'm inspired to create more now! Your site has a good energy...just as an art class should!
thank you for your wonderful site and for being so generous with your ideas. I have been teaching art for 24 years to middle school students.I have stayed clear of projecty type lessons until seeing your site. Your lessons are fun and have a back door approach to teaching the art elements and princeples of design that I have been teaching through the basics of drawing, painting printmakeing and clay. I was getting a bit burned out. Thank you for helping me deep things fresh and fun!!!
Thanks Lynda! Your wonderful comments are very well timed! It made my day.
Post a Comment