 Aren't these the most adorable things you've ever seen? I spotted a Sock Monkey Calendar at Border's bookstore and knew the colorful photographs would make an outstanding art lesson. I mean who doesn't like these nostalgic toys? The lesson is easy and introduces a new technique for my students: paint scratching. The collage aspect of this lesson fills the much needed desire for kids to cut, paste and create.
Supplies:
- 12 x 18" colored Tru-Ray Sulphite paper (construction paper)
- Black oil pastel
- Palette of brown, white and red tempera paint
- colored yarn, ric-rac, pom-poms, googly eyes, painted paper or paper scraps, buttons...anything decorative!
I use a directed line drawing approach to this art lesson figuring it never hurts to have a good base for all the decorative fun that's coming in step three! No need for elaborate instructions as you can see the drawing is quite easy:
- Draw two dots for eyes
- below the "eyes" draw a large ovals on its side. Then draw another larger oval around that. Add a line in the middle for the mouth.
- Starting at the outside oval on the left hand side, draw a line up and around to the other side of the oval. This will become the head.
- Draw a curved line at the top of the head to mimic toe reinforcements.
- Add two ears to the side of the head.
- Draw a simple body and skinny arms.
Using white tempera paint (do not wet brushes), paint the mouth and the top of the head with white paint.
 Let dry slightly and then paint over the white area with brown or black paint. The paint in this picture looks purple, huh? It's really brown.
 Turn the brush around and with the tip, scratch lines away to mimic ribbing. Tip: Do not let brown paint dry. It's critical that the wet brown paint slide right over the dried white paint. Kids love this part!
Finish painting the body with brown or even gray paint (use the double-load technique with the black and white paint).
Then, use an oil pastel to trace over all painted black lines.


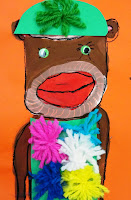
I love how this student used strands of yarn to create his own pom-poms. The picture on the right shows some great eye detail.
Step Three: Decorate your Sock Monkey
Set out tray fulls of embellishments and demonstrate a few easy ways to decorate the sock monkey. I show options for eyes, show how to cut a piece of paper to fit the head and even make simple pom-poms.
This is truly the best part of the lesson. Kids enjoy the process of experimenting and coming up with the most unique monkey.
 Third Grade Results!





11 comments:
OMG these are so cute. I bet it could work with a lot of different grade levels :)
http://hopechella.blogspot.com/
This is darling! I have always thought monkeys are so hard to make but you make it look so simple here.
Wow! Another great project! I'm off on maternity leave, when I visit your blog I get so inspired and I can't wait to try this one out in a couple of months!
These are FANTASTIC! I was looking for something fun to do before spring break and I think the kids will LOVE this. Thank you for your blog, THANK YOU!
So happy and fun!! I bet these look FABULOUS in the hallway!! : )
Patty,
You are just too cool! Love it! I have to get myself to a school that you are working at when I come back. I need weekly art with you. So much fun!!!!!
Thanks everyone...these monkeys were a BLAST to make. Really. The kids were spell-bound during the directed drawing and absolutely frenetic with the creative collage. Couldn't ask for more.
What a wonderful lesson. It reminds me of the sock monkeys my grandma was so good at making. She sewed them up like crazy. And the outfits were outrageous! Thanks for the inspiring idea. I bet some of my students would love to do this assignment.
Adorable~ This would be a great go along with reading "Caps for Sale".
thank you for sharing!
You ALWAYS inspire me.
I can just see the little boy that made the one with the tie "Can I give mine a blue mouth?" I LOVE these! www.elementaryartfun.blogspot.com
"Can I have a blue mouth?" Exactly what he said!
Post a Comment