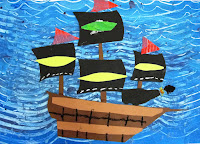
 This lesson combines many techniques: drawing, cutting and shaping with paper, painting waves and composition. I chose to do this lesson with an upper grade class but it's suitable for much younger children as well.
Supplies:
- Brown, black, white and gray construction paper (I cut the white, black and gray paper in 4" x 6" pieces, the brown/black in long strips for masts and a larger brown for the hull)
- scissors and glue sticks
- oil pastels
- 12" x 18" white construction/sulphite paper
- tempera paints in blue/green/purple/light blue and white and red/yellow
- larger paint brushes
Mix up some tubs of paint and add some large brushes to the tubs. Paint the entire paper with one blue. If you want to have a sunset, add a horizon line and paint above the line orange and below the line blue.
Now, add a contrasting color and swirl the two together. Students can use plastic forks, the backs of their brushes or even their fingers to create waves. Use any technique you would like as long as the entire paper is covered with paint!
Set aside to dry.


Step Two: Making the Pirate Ship
I drew a few pirate ships on the white board to give the kids an idea of different shaped hulls. Don't get too fancy here as the idea is to draw a very simple hull with an oil pastel and then cut out. To make it easier for the students, I pre-cut brown pieces of paper (approx 4" x 6") and had them draw on that paper. This just makes sure that they don't draw too large or too small. It seems to work, so give it a try.
I also assisted the kids in cutting (with my large trimmer) different sized masts. I mass-produced a big pile and the kids selected two or three.
Once the hull is cut out, turn it over to the bad side and glue on the masts. At this point, the ship is free-standing and not glued to the paper.
Now start cutting out sails with the smaller pieces of paper. Here's a tip: cut out a square, trim the bottom to form a curve, trim the two sides to form curves, leave the top uncut.

Step Three: Embellishments
After the sails are added, flip over the pirate ship and glue to background. Putting the ship on a slight angle will give the picture movement. Using oil pastels and scrap paper (if you wish) add details to the sails, fish in the water, decorations on the boat, etc. The kids love this part. Give them a challenge by asking each student to come up with his/her own insignia for their sails.

 Fourth Grade Results:










8 comments:
Ahoy Matey! These are wonderful!! I love anything pirate.. :)
Amazing! :)
http://web.me.com/charlinelking/Glacier_Peak_Art_Room/Welcome.html
I want to do this with my after school kids now. Love it! Thanks for sharing :)
I appreciate the labor you have put in developing this blog. Nice and informative.
Beautiful! I love the Eric Carl feel to this project. :-)
We linked back to you, with a 5-year old's effort on this project. :-) Thanks so much for the wonderful ideas!
http://wendyjanelle.blogspot.com/2010/02/daddy-daughter-dance-and-super-bowl.html
Well shiver me timbers these boats are brill!
We do a Pirates topic with our 5 and 6 year olds; I think we will give these a try - the way the waves are made is just so clever. Again, thanks for sharing! Your blog is my favourite art tutorial source.
Great---since my school are Pirates!
Post a Comment