Showing posts with label Drawing. Show all posts

Monday, May 10, 2010

Keith Haring Art Project

I thought I'd revisit this lesson from a few years ago. It's a perfect lesson to get you through an end-of-the-year slump. 5th graders love the graffiti nature of this project. To expedite completion, use a smaller size paper.
Fifth and Sixth grade students love Keith Haring! They are inspired by the simplicity of his action figures and influenced from his break dancing and graffiti like-art.
As a teacher, I love this lesson. I pass out a container full of prisma-color markers and let the kids go wild! I only have a few tips for this type of lesson. Practice drawing the Keith Haring figure first and then tell the kids to color in their figures with a solid color.
We brainstormed over backgrounds, but mostly I wanted the kids to come up with their own. We spoke about color and energy, but really, the kids got it.


Friday, July 10, 2009

Overlapping Bird Drawing


Here is a lesson that I taught to my second graders a few years ago. It was a great "intro-to-drawing" lesson but after teaching the lesson, I felt it would be more age appropriate for third grade and up. The skills are slightly complex and while most kids did very well, I remember a few frustrated souls and that's something I hope to avoid in the art room!

Supplies:
1 piece of 12" x 18" white drawing paper
I pencil and eraser
I black fine tip marker
Colored pencils, oil pastels, markers or crayons (whatever your preference!)

Step One: Drawing the First Bird
The idea here is to draw three birds of varying sizes and even shapes. I show the kids how to draw a simple bird and then lead them through a directed line drawing . I ask them to place their first bird near the bottom of the page. For young kids, this is hard. Demonstrate visually by placing an actual size paper on the white board and point to where the beak starts. A surprising number of kids will draw the beak towards the middle of the page (especially if they are left handed). This leads to some problems (no room for the body) so take your time at the beginning. You can speed up later.

Here is a step-by-step drawing guide for you...


Step Two: Drawing the Second Bird
Now, draw another bird, either in the same direction or facing the opposite way, just above the first bird. Okay, now here is the trick: tell the kids to "jump" over any lines they come in contact with. For example: if they are drawing the belly of the second bird and they are about to "run" into the head of the first bird, lift up the pencil to "jump" over the line and then begin drawing again. Of course, if this is challenging, here's another plan of action....

Alternative (better for younger kids)
Just above the first bird, have the kids draw a second bird, but this time, completely ignore the first bird. If lines get in the way...forget 'em! Just go straight through them.

You can see from the illustration above, that the birds all intersect one another. You can also see how confusing albeit fun, this can be!

Next, take a black marker and trace the first bird completely: beak, head, body and tail. Then, and this can be tricky so make sure the kids watch first...trace over the second biord's pencil lines but make sure to "jump" over any lines that intersect the first bird. The second bird is now behind the first bird.

Do this step again for the third bird.
Finally, ERASE all pencil lines.

Step Three: Coloring
Once all the birds are outlined, the kids will have three birds of varying distances. Now it's time to have some fun. If they want, add polka dots, stripes or feathers. Use any color they wish!
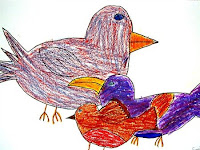


Second Grade samples...

Thursday, April 30, 2009

Terrific Toucans: Drawing and Painting Toucans for Fourth Grade

Aren't these fantastic? I absolutely love how each toucan has it's own personality. This is the yardstick I use to measure how successful a project is. If the artwork is unique to the artist, then I'm happy.

To begin, I show my students a few images of toucans and talk about the beak. I demonstrate a few drawing techniques and then, using a black oil pastel, the kids draw their own toucan. I suggest they begin with the eye and then draw the beak. If the beak is large enough, then it almost doesn't matter what the body looks like; everyone will know it's a toucan!
I really think not using pencils in this project is beneficial. Using an oil pastel loosens the kids up, encourages them to draw large and if they make a mistake, I tell them that the tempera paints will cover it.
After the drawing is done, the picture should look like a coloring book page; black and white and ready to color.
We use tempera paints and once the painting is dry, the kids go over all the oil pastel lines with a small brush dipped in black paint.


This artwork is created by the artists in Mrs. Kornahren's 4th grade class at Brandon School

Tuesday, April 28, 2009

How to Draw a Pig

Using the same technique as the Kinder Cows, this lesson teaches your little ones simple drawing techniques and offers enough options for each child to create their own little piggy!

Supplies:
  • 12" x 18" white drawing paper
  • Black, pink, white, green and yellow oil pastel or crayons
  • Red (watered-down), green and blue liquid watercolors
  • Brushes and Water

Step One: Begin with a 12" x 18" white drawing paper and a black oil pastel and draw a small circle towards the LHS of the paper. Then, draw a large curve, starting at the right of the circle (head) and going all the way around until you reach the bottom of the circle (chin).


Step Two: Draw two straight lines for legs complete with inverted letter "V" for hoofs. Draw a small circle with two short vertical lines inside for a snout, two dots for eyes and two ears. Lastly, draw a curly tail.
Step Three: Using a white oil pastel, color in white clouds and a fence line. Using a green oil pastel, add grass. Yellow oil pastel for a sun, etc. Continue until the child has enough detail in his picture. You can suggest butterflies, flowers, etc.

Step Four: Set out a tray of blue, green and pink (watered down red) liquid watercolor paints and large wash brushes. This step takes very little time.
Set out to dry and Viola! Pretty Pigs!


The artwork in this post is from Mrs. DeLaney's Kinder Class at Brandon School

For more watercolor lessons, checkout Deep Space Sparkle's "Watercolor Projects" PDF booklet. Click HERE for more details.

Tuesday, April 21, 2009

Kinder Cows!


I had a request from one of my kinder teachers to teach a class on drawing animals. Not exactly my forte, but I remembered a cute lesson in the Art Projects for Kids Blog. Kathy created an adorable cow, complete with a graphic on how to draw the little Holstein. Here is Kathy's post.

I experimented with the instructions, but with only 30 minutes to draw and paint the cow, I knew my instructions had to be fool proof.
I debated whether or not to use a pencil. As you might know, I'm not a fan of pencils for most elementary art projects because it gives the kids a chance to No. 1, draw too small and No. 2, be too perfect.
But I knew if the kids drew directly onto the paper with a black crayon, there would be lines where lines shouldn't be (neck and legs).


I threw caution to the wind and decided to try both methods. For my first class of kinders, I handed out crayons and proceeded to show them how to draw the cow. I drew it on the white board and used lots of adjectives so they'd remember the steps. Then, I let them go to it. Some kids eliminated steps on their own, thus didn't have the extra lines. (Unfortunately, I didn't take photo's of this step).
For the next wave of kinders, I used pencils and we drew the cow together in direct line sequential. Here, I found my original theory to be accurate. The legs looked like toothpicks and a few kids added way too many details. Not a bad thing mind you, just harder to paint. After the pencil drawing (and yes, many requests for an eraser), the kids traced over their pencil lines with a black crayon.


I encouraged the kids to add clouds, a sun, flowers, large back spots, etc.
The painting part was super fast. Set out large wash brushes and premix some blue and green watercolor paints. Easy peasy.


So, the lesson in all this? Don't use pencils.


I saved my best tip for last: If you're in a time crunch, use a cardboard template to trace for the cow's body. I set a couple of these per-cut templates on each table and gave the children the option of using them. Some kids turned up their noses at the extra help, while others dove right in. For teachers, it's really a quick way to get the project started and makes for a good sized cow.

The artwork featured here is from Mrs. Moore's and Mrs. McCabe's Kinedr class at Mountain View School

For more watercolor lesson ideas, check out Deep Space Sparkle's "Watercolor Projects" PDF booklet.
Related Posts Widget for Blogs by LinkWithin






