I've received so many amazing emails lately. There is just nothing better than a big thank you for all the work that goes into blogging. When I started this blog a couple of years ago, there were so few of us. Maybe two or three people with art blogs. Now, there are hundreds! Yay, for us! Many of my emails have desperate pleas associated with them. I posted this article last year, but I thought I'd post it again with a few updates.
Inspired by a recent comment from Sarah S, I thought I'd address a few concerns that some teachers face when teaching art to their students.
Sarah commented that when she painted with her students, the projects never really seemed to "turn out". I know exactly what she means. Perusing art pages and seeing countless beautiful works from little bitty kids makes me wonder too, how the heck did they do that? First of all, it can be done, BUT it takes a bit of organization and a few fail-safe techniques. Here are my secrets....
Okay. So before I go any further, I want you all to know that I believe strongly in the mantra that art is about the process not the end-results. Still, it doesn't hurt to make the most out of every project.
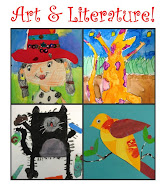
For painting lessons with younger kids, I often hand out a black oil pastel to trace over the lines once the paint is dry. Similarly, black paint is used for the same purpose. This simple step creates the strong contrast that is so appealing in kid's art.
Here are a few examples:


(Click on the photos to read the instructions)
Tip #2 Setting up & Storing Paints
Fact: Paint projects scare teachers. All that prep and mess. Not to mention the student who can't seem to finish his project. But parents love art and so do the kids so you know you gotta do it.
Here are a few tips that can help make the inevitable less daunting.
Here are a few tips that can help make the inevitable less daunting.
 Instead of an individual paint palette, try encouraging your students to share. That's right. Share.
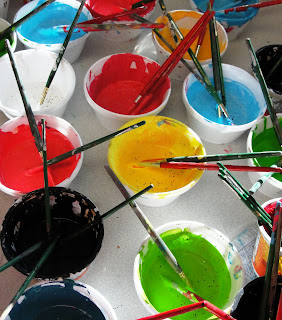
I use plastic "muffin tins" for paints. These can be found in any art catalog and are quite helpful in reducing the amount of paint you use and saves time in set-up. If I have 25 students, I set out one tray for every table. That means 5 trays for 5 tables. Easy peasy.
Each child then gets a paint brush and access to two water containers. If you are in a classroom with individual desks, art set-up will be a bit tough. This is a worse case scenario if you ask me! All I can suggest is to use paper plates with small blobs (quarter size) on each plate.
What about mixing?
I get asked this all the time. I encourage my students, especially the lower grades, to mix paint on their artwork. Yes, you read correctly. Kid's often get way too hung up on finding the "perfect" color and mixing becomes a waste of time. I teach the kids to "double load" their paint brush. Dip the brush into one color (say yellow) then dip straight away into another (say blue). Now, the paintbrush has two colors on the bristles. The kids love smearing the brush along the paper and seeing the colors mix by themselves. A bit of art magic.
 This can get messy but the more your reinforce this concept of sharing paint, kids begin to ease up on their personalized agenda for getting their own palette and revel in the fun of art. If you have small classes, and providing personalized palettes is an easy thing, then by all means do it.
The method above only applies to lessons when the paint colors are up to the students. For a color mixing lesson like my Colorwheel Clowns, I use plastic or paper plates.
How do I store my left-over paint?
Everyone has their system for saving paints. A few teachers I've know about avoid paint altogether. Definitely not the approach I'd recommend.
I rarely save my paints. I try to use just enough paint for my class then end up washing the palettes afterward. But this is getting tiresome.
The exception sometimes goes for liquid watercolor paints. Since I use the "muffin" type palette (shown above), it's almost impossible to pour off the remaining paint. So, if I need to save the paint because I have a class the next day working on the same lesson, etc., I cover the trays with plastic wrap. Simple, huh? I stick the palettes in a cupboard and remove the wrap when I need it. Of course, this only works if you have enough paint trays for the rest of your classes.
I've seen a few pictures of art rooms on the Internet and I know that some teachers still use Styrofoam egg cartons as their go-to paint caddy. This is a great use for your recyclables. I noticed another art teacher uses small plastic condiment cups (the kind you get in Mexican restaurants to hold salsa). These are perfect! They are the perfect size for paints, fit nicely in my muffin tin holders (so they don't spill over) and...the best part...they come with snap on lids! Costco or Smart and Final will have these.
I hope this helps you conquer some of those pesky problems that are all too common in an art room. I know I have my won weakness, such as Clean-Up. My Achilles heel, for sure. Add your own two cents and let's see if we can solve more problems.









15 comments:
Love your site! Refer to it all the time--especially since I'm in the process of creating my own art blogs. Thanks for sharing ur ideas.
Great tips, as usual! I usually use paper plates, but think I'll try the muffin trays and see how it goes. Generally speaking, I am a quite ecologically minded person, but I've come to peace with needing to throw out paper plates on painting days: my sanity is good for the world, too!!
One other method people may be interested in: when I paint with kindergartners I usually put out paper plates with just 2 or 3 colors per plate. For the little ones, I don't put out water for brush rinsing: I just put two brushes in each color and ask them to switch brushes when they switch colors... less watery mess.
And finally, over the years I have really learned the importance of teaching kids a good way to rinse their brushes (when we do use water rinsing cups). I show them what TO DO (tap the brush on the bottom of the cup gently until no more paint comes out. then hold the brush vertically as you wipe it up the side of the cup to let the excess water drip off) and what NOT TO DO (splash around in the water, swirl around in the water- whirlpool, watch out!, flicking the brush on the side of the cup to get water out, or tapping the ferule on the edge of the cup. All these things can cause serious splash marks and more mess to deal with.) I tell them they can clean their brush however they want to at home, but in the art room I really need them to do it this way out of respect for their art and others' art. I think they like the responsibility! Didn't mean to go on so long, but I guess I am learning how well kids respond when they learn specific helpful tricks.
Hi Patty - I love your idea about using the muffin tins with the plastic salsa cups inside... I'm excited to give that a try! Also, like Lucy (above comment)I teach the same specific technique for brush rinsing and even my K's have caught on quickly.... it has saved my sanity!! Thanks for all your helpful ideas. I love how teachers are always learning from each other!! :)
For the past two years I've been using plastic baby food containers (thank you, Gerber and my toddler son!) for my tempera paint. I can put out just the colors I need for a particular class (grade 1 needs primary colors, grade 5 might need more choices), and I feel good because anything leftover at the end of class gets covered and saved for the next day. I also like that I'm giving the containers a second job :) If you don't have your own baby, ask around - I've had other teachers and parents bring them in for me (and I do specify that I don't use the glass jars).
Love your ideas here!
Yes, I too use those styro- egg cartons, but only for tempera. I also use the muffin trays with the salsa cups. :) But those are for the liquid watercolors. They stack wonderful and my metallic water paints are still active from early September! They never dried out! Great post. Once you conquer the painting technique it is really easy!
Thank you for your website! I love visiting and seeing what other art teachers are doing with their classes. Regarding the paint...I have found ice cube trays to be very handy (especially for the older elementary grades). I load them up with the colors that are needed and they store nicely in zip-lock bags until the next week. I can usually fit two trays per bag. The bag usually can't zip, but they are re-used each week to cover the trays until we are finished the project.
I'm one of those scared of paint art teachers. The problem is this...I dont have the TIME to set up between my rigorous schedule (you've seen it...!)...so, tempera CAKE have been my saving grace this year!!
Same great look...but, way less work.
Thanks for all your suggestions.
I use baby food jars. It saves a lot of clean up time and a LOT less waste! :)
LOVE THIS SITE!
I use the ice cube trays as well. Put all of them in a grocery sack adn the paint stays fresh a long time.
I do the same with liquid watercolors and actually use a dropper (think half-size turkey baster) to recycle any left over paint. I have to provide and pay for all supplies, so I'm exceptionally frugal.
You can also just use magazine pages( quality paper) to put the paint on. It is then very easy to fold up and place in bin.
Another ideas is using the paper with all the messed up paint on it for a mono print. Have a stack of litho paper available about a4 size. Turn the paint paper over and press onto the litho. Dry and use for eric carle collage activities .
Finally left over paint can be used by the early finishers to paint onto a large sheet of strong cardboard or a very large canvas to create a class mural? This might take a few weeks but is a great way to use up spare paint.
Now here is a great tip for removing acrylic paint out of clothes. Soak affected area in methylated spirits over night. Place in desert bowl , pour over meths and cover with sauce.
Another helpful tip
Removing PVA glue from brushes. Soak in hot water with Wool wash detergent. over night. Easy to clean. out. I also use plastic lids or similar for PVA glue. It can dry and then be peeled off the next day.
My hints are courtesy of 20 years of art teaching.
Cheryl H
Perth Australia
Love your suggestions and thank you for answering my question!!! :) I felt like a celebrity seeing my name. HAHA! I don't know, it's bizarre. We do the outlines, it just something about your colors and the brush strokes. Maybe it is in the way you teach that? It's magical none-the-less.
Also, what kind of watercolor paper do you order? I can't find anything within my budget and was wondering where you find it!
Sarah, I only purchase cartridge paper for water colour/ acrylic paintings. I assume you call it the same thing. It is just very heavy type of photocopy paper but more absorbant. AS I am in australia My supplier would not help you with this. Mind you the cost is constantly rising.
Hi Sarah,
I use Biggie Brand from Canson. I think it's the cheapest.
I like stancups but then can become expensive. For the younger grades I use Biggie Cakes. Love reading your blog! Thanks.
Post a Comment