 While looking through the library one afternoon, I stumbled across Kevin Henkes's picture book, "Old Bear". The adorable illustrations inspired me to create a combination bear painting and leaf print art lesson for my fourth graders.
We used one 50-minute period to draw and paint the bear and another period to print the leaves.
This lesson was a huge hit with the kids.
 Supplies Part I
12" x 18" white paper
Brown and black tempera paint
Black oil pastel
Scissors/glue
Step One: Drawing the bear
I don't have any easy way to tell you how to draw a bear. I demonstrated two ways: the contour method (drawing the outside line first and then filling in the details) and the shape method (using shapes to identify different parts of the bear). Ultimately, I let the kids chose which method they preferred and gave them some photocopies of the book pages for inspirations.
Using a black oil pastel, the kids went at it, crossing out the lines they didn't like and moving on with the ones they did. Most kids found it helpful to start with the nose, then put in the eyes and then draw the head around that.
Using a black oil pastel, the kids went at it, crossing out the lines they didn't like and moving on with the ones they did. Most kids found it helpful to start with the nose, then put in the eyes and then draw the head around that.
Step Two: Painting the bear
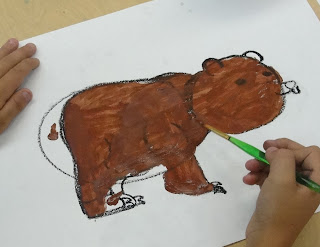 Then, with a small brush, make small strokes around the bear, filling in the face, the nose, the underbelly, etc. It's really helpful to look at the illustrations from the book.
 After the paint dries, cut around the bear, leaving a small amount of white paper showing.
Supplies Part II
12" x 18" Black paper
Fresh leaves snipped from trees
White, orange, gold and bronze tempera paint
Smooth, flat brushes
Scratch paper
12" x 18" Black paper
Fresh leaves snipped from trees
White, orange, gold and bronze tempera paint
Smooth, flat brushes
Scratch paper
Step Three: Leaf Printing
Using leaves found around the school yard, I place a variety on each table. Start by painting the underbelly (the vein side) of the leaf with white paint. Then, place the leaf, paint side down onto the sheet of black paper. Place a piece of scratch paper over the leaf and rub gently. Sometimes it's helpful to press down as well. Carefully peel away the scratch paper and leaf to reveal the white painted leaf print. It's okay to use the same leaf more than once. Now that the leaf has a white base coat, paint some color on top of the white paint and press onto the black paper. The creaminess of the white combined with an orange works really well on the black paper. Just using orange for instance, doesn't produce as pleasing of a result.
 Continue to make leaf prints on the entire paper especially around the edges.
Step Four: Adding Details
 It's fun to use the back end of a brush dipped in white paint to create snowflakes. Some children painted snow and others, stems for their leaves.
Step Five: Putting it all together
 Glue the bear onto the leaf printed paper and enjoy! I love this art...so beautiful. My fourth graders were very impressed with themselves!
Fantastic Fourth Grade Bears...








8 comments:
This is so adorable! You have a knack for taking the ordinary and making it extraordinary! Thank you for your blog...I LOVE it!
This is wonderful. The kids all did such a nice job drawing and painting their bears. I love how each bear has a unique personality. And the combination of the bears and the leaf print is fantastic. No wonder they were impressed with themselves!
Your 4th graders did such a fabulous job on your new lesson with the leaf prints and bear painting. Thank you for posting all the details. I am anxious to try this lesson very soon with my eager bunch in gr 4. I know it will be a hit!
Just found your blog, these ideas are great, thanks so much for sharing!
Thanks everyone! As far as lessons goes, this was one of my favorites. You can easily change it as well: paint colors for leaves, a fox instead of a bear, etc.
I need to set up some sort of share file...maybe flicker...where we can all share our interpretations of the same lessons.
Wow! I like how these turned out! They look great. I like how the bear was cut out and then placed on the background paper.
Super-duper Love these bears! Great lesson.
They are FANTASTIC! I love it and plan to do this project as well.
Post a Comment