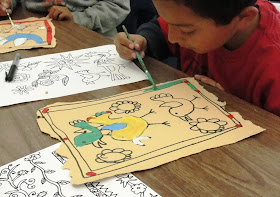
 Based on "Folk Art Lesson" in the book Art Projects from Around the World (Scholastic 2006), I adapted the images to create a very cool "bark" painting for fourth grade.
Supplies:
- 6 x 9" brown or tan paper (paper bags or craft paper works well as does construction paper)
- Tempera paints in red, white, yellow, green and blue (to make regular tempera paint stand out against the brown paper, add a bit of white to the green, yellow and blue. It'll brighten it just enough)
- Black "Sharpie" marker
I began this lesson by talking a bit about Amate Bark Paintings used by the Otomi Indians of San Pablito, Mexico. If you've ever made home-made paper before (I did when I was sixteen!), you'll know that you can put almost anything into a blender, whoosh it up, smooth it out and strain it. Once it dries, you have paper. It's the same for bark painting. the kids seem amazed that tree bark can actually turn into paper!
Anyway...instead of mushing bark into pulp, we torn the edges off the paper. I demonstrated the proper technique for ripping paper: use thumb and pointer fingers on both hands and slowly tear.

Then, using images I found on the Internet representing Mexican Folk Art, the kids drew a border around the paper then added fanciful birds, Mexican suns and flowers to the middle. I used the rule of three to encourage repetition: 3 of the same birds (can be different sizes) or three of the same flower, or one large sun and 2 birds of equal size. It mostly worked but many kids still tried to fit every image onto their paintings. Oh well, it's all fun!
After the drawing was done, it was time to paint. I used tempera paints but fluorescent might be better.

This is a good time to review the difference between a LINE and a SHAPE. Paint inside the shapes, but not over the lines. It helps.
Once the paint is dry, the kids can add details with a black pen and go over all their lines (we didn't do this yet).
Fourth Grade Results!


great lesson- thanks for sharing : )
ReplyDeleteThese are lovely, easy and teach something new (I didn't know of this folkart before either!). Thanks.
ReplyDeleteThese are so beautiful!
ReplyDeleteI love your adaptation of this project. These are wonderful! I definitely would like to do this lesson. Thanks!
ReplyDeleteThese are beautiful. I think I could even get my kinder kids to do something similar during stations. Thanks for the post!
ReplyDeleteI am just curious as to where you found your images I would love to try these with my kids. Thanks
ReplyDeleteGreat paintings!!! Where did you find the images of folk art??? Any particular sites???
ReplyDeleteThanks!!
Regarding the source for the folk art image: none, really! I did a google image search on Mexican Folk Art and Amate Bark Painting and just improvised with what I saw. As you can see from the children's art, the images are not that complex or original.
ReplyDeleteGood luck!
Ok I spent about two hours this weekend searching for folk art images and let's be honest...nothing even remotely compares to the idea sheets you gave your kids and we can see in the photos. Could we persuade you to pdf them and let us buy them like the Egyptian lesson plans? pretty please!
ReplyDeleteThanks! :) love to try these with my kids.
ReplyDeleteHi Sweet Saffron,
ReplyDeleteRegarding images, I'm not trying to be dishonest or withhold anything...I just thought it'd be easy for you to see the images on the kids artwork. This might make a good PDF though. I'm working on a PDF inspired by different cultures....perhaps you'll see it soon!
Patty, I have all your downloads. I use them in my classroom. I'm looking forward to the multicultural lessons.
ReplyDeletePS. Couldn't find any nice images on google. Yours are the best! :0)
I have completed this activity with year 4,5,6 , These kids just loved the activity. What I used to embellish the birds even more was using Faber Castell colour burst pens. They come in 4 colours . These pens are opaque and provide additional pattern and texture. I am from Australia and we spell colour differently!!! I will put some up on a picasa web album next week.
ReplyDelete